
Library basics
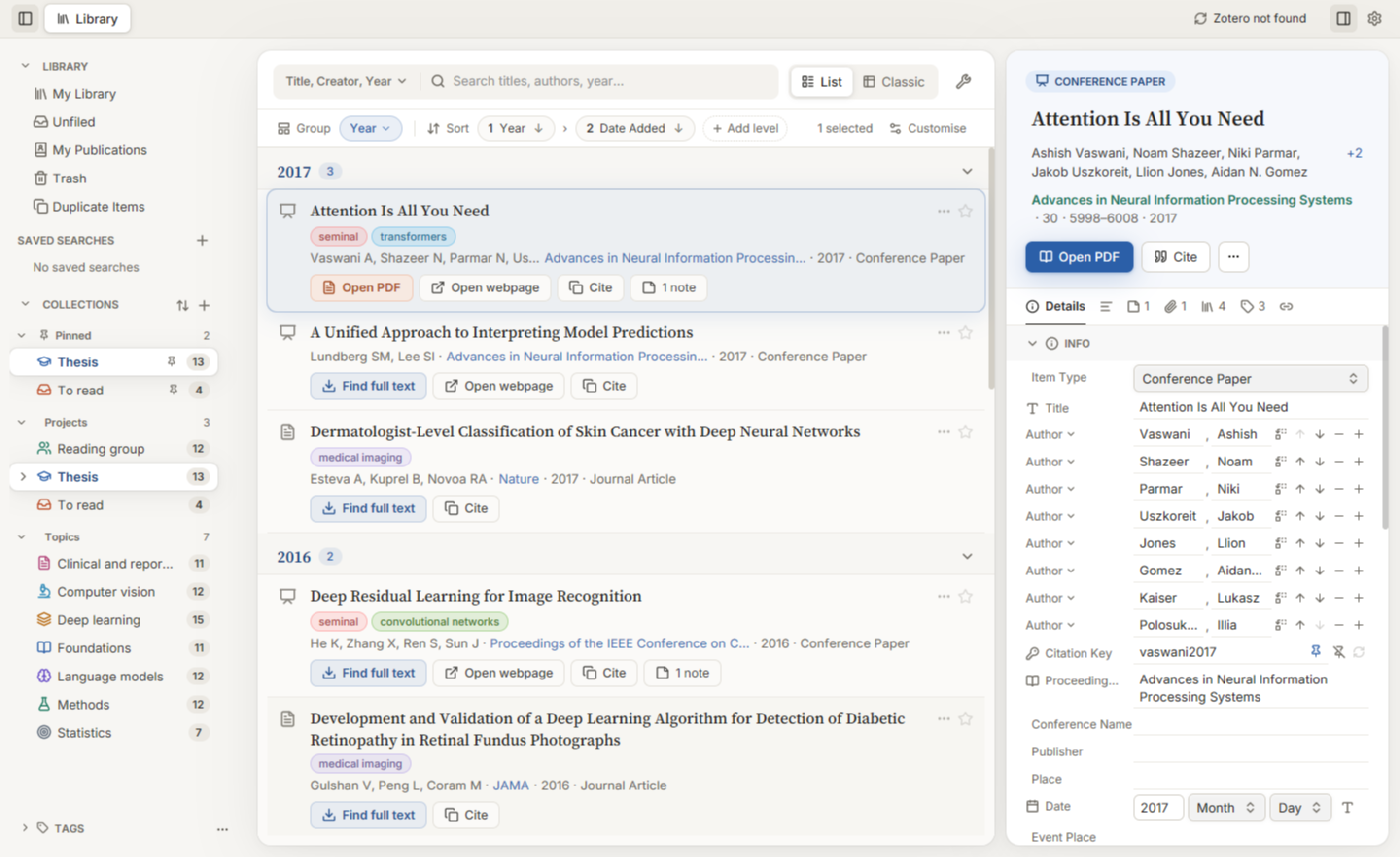
The main window has three panes: the sidebar on the left (library views, saved searches, collections and tags), the item list in the middle, and the item pane on the right. The two side panes can be hidden from the top bar or from Settings > General (“Show the sidebar”, “Show the item pane”). Under Settings > Appearance > Sidebars you can also choose which groups the sidebar shows and which sections the item pane shows, and in what order.
The item list
The toolbar above the list has a search box, a view switch (List and Classic), a tools menu (the wrench icon) and the Add button. When the list is narrow, the List and Classic buttons show only their icons, and when it is narrower still, Add does too. The search box keeps a minimum width.
List and Classic views
| View | What it shows |
|---|---|
| List | One card per item: title, coloured tag badges, creators, publication, year and item type, and a row of buttons (for example Open PDF, Open webpage, Cite, Find full text, a note count, and a paperclip count). The paperclip count is the number of attachments beyond the one the open button uses. Click it to list them. |
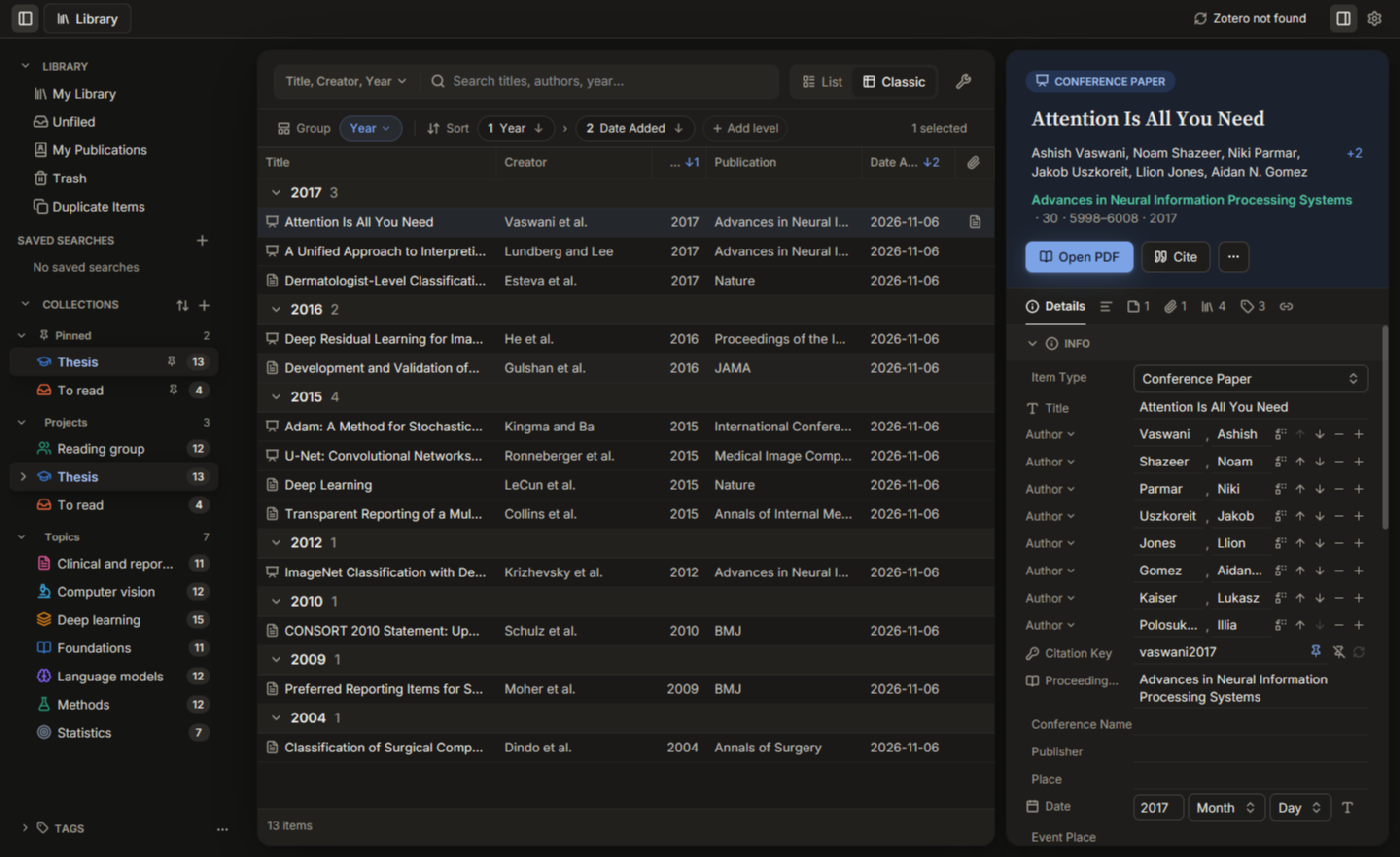
| Classic | A table, one row per item, with sortable columns. |
Choose the view the library opens in under Settings > General > Default view (the setting calls the two views “Cards” and “Table”).
Customising cards. In the List view, click Customise at the right of the sort bar. The dialog lets you choose:
- the title line: a star toggle, coloured tag badges, and optionally uncoloured tags too;
- the authors line: full list, “3 + et al.”, summary, or hidden;
- the details line: which fields appear, in what order (use Add field…, the arrows and the remove button);
- the icons line: notes, PDF and attachments;
- density: Comfortable or Compact.
Reset restores the defaults.
Customising columns. In the Classic view the column picker follows Zotero’s list: Title, Creator, Item Type, Date, Year, Publisher, Publication, Journal Abbr, Language, Accessed, Library Catalog, Call Number, Rights, Date Added, Date Modified, Archive, Loc. in Archive, Place, Volume, Edition, Number, Pages, Issue, Series, Section, Short Title, Extra, Citation Key, Attachments, Notes and DOI, plus any other field the item schema defines. The default columns are Title, Creator, Year, Publication, Date Added and Attachments.
Grouping and sorting
The bar under the toolbar controls both:
- Group: None, Year, Item type or Publication. The default is Year. Each group gets a collapsible header with a count.
- Sort: up to four levels. Click a level chip to pick its field, click the arrow or “A-Z” part to reverse it, and use Add level for a tie-breaker. When the list is grouped, the first level is the grouping field and cannot be removed.
The right-hand end of the bar shows the item count, or “N selected” while items are selected.
When the list is narrow, the Group, Sort, Add level and Customise labels give way to their icons. A sort level chip with a long field name ends in ”…” instead of running past the edge of the bar.
Attachments and notes under an item
An item that has attachments or notes shows a twisty, a small chevron. In the List view it sits under the item type icon. In the Classic view it sits at the left of the Title cell. Items with no attachments or notes have no twisty.
Click the twisty to open or close the item. An open item shows one child row for each attachment and each note. Clicking the twisty does not select the item. Open items stay open when you switch between List and Classic or move to another list. They close when you close the app.
A child row shows an icon and a title. The icon tells the kind: PDF, EPUB, snapshot, web link or note. An attachment with no title gets a name from its kind: “PDF”, “EPUB”, “Snapshot”, “Web link” or “Attachment”. A note with no title shows “Note”. In the List view, an attachment that has annotations also shows a highlighter icon and the number of annotations.
On a child row:
- Click it to select it. The item pane shows that attachment or note.
- Double-click it, or press
Enter, to open it. A PDF, EPUB or snapshot opens in a reader tab. Any other file opens in its default app. A web link opens in your browser. An attachment with no file shows the message “No attachment or link to open”. On a note, it selects the note’s parent item.
With the list focused, these keys work on the tree:
| Keys | Action |
|---|---|
Right |
Open the item. If it is already open, move to its first child. |
Left |
Close the item. On a child row, move to its parent item. |
+ |
Open every item in view that has attachments or notes. |
- |
Close every item. |
Up and Down |
Step through the child rows of open items one row at a time. |
If you close an item while one of its child rows is selected, the item becomes the selection.
Searching
The search box filters the current view. The box on its left sets what it searches (also under Settings > General > Quick search mode):
| Mode | Matches |
|---|---|
| Title, Creator, Year | Words in the title, creators or year |
| All Fields & Tags | Any field, creator or tag |
| Everything | Also notes and attachment full text |
Press Ctrl+F to search the library. For multi-condition searches use Advanced Search.
Unread dots
A small accent dot marks items you have not opened. Turn it off with Settings > General > Show unread dots. Use Mark as Read or Mark as Unread in the item menu. This state is stored only on this computer (in read-state.json in the settings folder, see Folders) and is not synced.
The item menu
Right-click an item (or a selection) for the menu:
- Open, and Locate (see Locate engines);
- Find Full Text and Find Full Text (open access only) (see Find Full Text);
- Mark as Read and Mark as Unread;
- Show in collection…, Add to collection, Copy DOI;
- Show in My Publications or Remove from My Publications;
- entries for adding notes and attachments, Duplicate Item, Merge Items… (with two or more items selected), Copy Bibliography, Copy Citation, Retrieve Metadata for PDF, Create Parent Item… and Rename File from Parent Metadata where they apply;
- Move to Trash.
Keyboard shortcuts
The defaults are Zotero’s. Press Ctrl+/ (or choose Tools > Keyboard Shortcuts) to see the list in the app, with any keys you changed. Change them under Settings > Shortcuts.
Commands (you can change these):
| Keys | Action |
|---|---|
Ctrl+Shift+N |
New item |
Ctrl+Shift+O |
New standalone note |
Ctrl+Shift+I |
Import |
Ctrl+Shift+Alt+I |
Import from Clipboard |
Ctrl+Shift+C |
Copy bibliography of the selected items |
Ctrl+Shift+A |
Copy citation of the selected items |
Ctrl+Shift+K or Ctrl+F |
Quick search (the search box above the list) |
Ctrl+Shift+F |
Advanced Search |
Ctrl+Shift+L |
Focus the sidebar (then use the arrow keys) |
Ctrl+Shift+T |
Show or hide the tag selector |
Ctrl+Tab / Ctrl+Shift+Tab, Ctrl+PageDown / Ctrl+PageUp |
Next / previous tab |
Ctrl+1 to Ctrl+8, Ctrl+9 |
That tab; the last tab |
Ctrl+W |
Close the current tab |
Ctrl+, |
Settings |
Ctrl+/ |
Keyboard Shortcuts |
Add Item by Identifier has no shortcut by default, because Zotero uses Ctrl+Shift+I for Import. Give it one in Settings > Shortcuts.
In the item list (click an item first):
| Keys | Action |
|---|---|
Up / Down, Shift+Up / Shift+Down |
Move through the items; extend the selection |
Home / End, PageUp / PageDown |
First / last item; a page up or down |
Left / Right |
Close / open the attachments and notes under an item |
+ and - |
Open and close the attachments and notes under every item (see Attachments and notes under an item) |
Enter |
Open the item’s PDF, EPUB or snapshot |
Ctrl+A |
Select all items |
Delete |
Move to the Trash (asks first for several items). In a collection: remove from the collection; the items stay in the library. In the Trash: delete permanently. |
Shift+Delete |
Move to the Trash without asking; in a collection, move to the Trash instead of removing from it |
1 to 9 |
Add the tag coloured at that position to the selected items, or remove it when they all have it |
In the sidebar (click a row or press Ctrl+Shift+L first):
| Keys | Action |
|---|---|
Up / Down |
Show the previous or next library, view, saved search or collection |
Left / Right |
Collapse or expand a collection; on a closed one, Left moves to its parent, and on an open one, Right moves to its first subcollection |
Home / End |
The first or last row |
+ and - |
Expand and collapse all collections |
F2 |
Rename the selected collection or saved search |
Delete |
Delete the selected collection or saved search (asks first; the items stay in the library) |
Zotero shortcuts with no counterpart here: Save to Zotero (Ctrl+Shift+S, a browser-connector key), the feed keys (Ctrl+Shift+R, Ctrl+Shift+` ), Shift+Delete on a collection (delete the collection and its items), and holding Ctrl to highlight the collections an item is in. The reader’s shortcuts are in Reader.
Library views
The first group of the sidebar, Library, holds fixed views:
| View | Contents |
|---|---|
| My Library | Every item that is not in the Trash. |
| Unfiled | Items that are in no collection. |
| My Publications | Items you have marked as your own work. |
| Trash | Deleted items. |
| Duplicate Items | Opens the duplicate merge dialog. |
Group libraries
If you belong to Zotero groups and sync with zotero.org, a Group Libraries group appears in the sidebar. By default it sits below Library, Saved Searches and Collections. Each group is a row with its own collections; click it to list its items, click a collection to list only that collection. Search, tags, the item pane and every view setting work within the selected library, and new items (Add by identifier, from a file, from a link, new item or note) are added to the library you are looking at.
Groups where you cannot edit are read-only. Edit actions are hidden or disabled, and fields are locked in the item pane. Anything that still reaches the library, such as a keyboard shortcut, is refused with “is a read-only library”.
The Duplicate Items merge works inside one library; items are never merged across libraries. Whole-library export and the MCP server accept a library choice too.
Upgrading. The first time the app (or the MCP server) opens an existing library after this change, the library file is upgraded. The change only adds: a Libraries table and a library column on items and collections, with your current data marked as My Library. Before it runs, a backup is written next to your library as library.backup-v3-to-v4-<date>.sqlite.
My Publications
Right-click an item and choose Show in My Publications to add it, or Remove from My Publications to take it out. Only regular top-level items can be added (not attachments, notes or annotations). The view is a filter over your library, so removing an item from it does not delete the item.
Trash
Move to Trash (or Delete) is reversible. In the Trash view the item menu offers Restore and Delete Permanently…. Right-click the Trash row, or use Tools > Empty Trash…, to delete everything in it. Emptying the Trash is permanent and is pushed to your Zotero library at the next sync.
Duplicates
The Duplicate Items row shows a count of duplicate sets. Selecting it (or Tools > Duplicate Items…) opens a dialog with the sets on the left. Sets are found by matching DOI, ISBN or title, and you can filter the list by those reasons.
For the chosen set you pick the master item (the oldest by default) and, for each field that differs, which version’s value to keep. Merge N items keeps the master, moves the others to the Trash, and combines their tags, collections, child items and relations. Not Duplicates marks the set so it is not offered again. You can also select two or more items and choose Merge Items… from the item menu to merge a set of your own choosing.
Collections
Collections are the folders of the sidebar. Click the + at the right of the Collections header (or right-click the header and choose New collection) to create one, and type a name. Drag items onto a collection to add them; an item can be in many collections. Collections can contain subcollections.
Right-click a collection for its menu:
| Entry | Effect |
|---|---|
| New subcollection | Creates a child collection. |
| Rename | Renames in place. |
| Pin to top / Unpin | Shows or removes a copy in the Pinned group at the top. |
| Colour | Tints the folder: Blue, Sky, Green, Amber, Rust, Rose, Violet or Slate, or None. |
| Icon | Replaces the folder with one of a set of icons (book, star, flask, microscope and so on), or Folder (default). |
| Move to section | Puts a top-level collection in a named section (see below). |
| Move to top level | Appears on subcollections. |
| Delete… | Deletes the collection only; the items inside stay in your library. |
Sections, sorting and grouping
The ⋯ menu of the Collections header sets how the list is arranged:
- Sort by: Name A-Z, Name Z-A, Date created, Date modified, Number of items.
- Group by: None, By colour, or By section.
A section is a heading you make yourself. Use Move to section > New section… on a collection, then group the list By section to see them. Right-click a section header to Rename section or Delete section.
Local only. Colours, icons, sections and pins are presentation settings stored on this computer (in collection-style.json in the settings folder, see Folders). They are not part of your Zotero library and are not synced.
Tags
The Tags pane at the bottom of the sidebar lists the tags in the library as pills, with a Filter tags box. It always stays at the bottom of the sidebar. You can hide it under Settings > Appearance > Sidebars. Click a tag to filter the item list by it; click several and they combine (an item must have all of them). The ⋯ menu offers Show Automatic (tags added by importers and translators are hidden by default), Deselect All, and Delete Automatic Tags in This Library….
Right-click a tag for:
- Assign Colour…: Red, Orange, Gray, Green, Teal, Blue, Navy, Purple or Plum. Coloured tags appear first in the pane, show a dot, and appear as badges on cards. Remove colour undoes it.
- Rename Tag…: if the new name already exists the two tags are merged.
- Delete Tag…: removes the tag from every item.
The palette is Zotero’s tag palette. Colours are stored in the library database.
Saved searches
Tools > Advanced Search… (Ctrl+Shift+F) opens a condition editor. Each condition is a field, an operator and a value. Fields include Title, Creator, Year, Date, Date Added, Date Modified, Publication, Item Type, Tag, Collection, Note, Attachment File Type, Attachment Content, All Fields & Tags, and any other item field under More fields. Operators depend on the field: is, is not, contains, does not contain, begins with, is before, is after, is in the last. The Match control sets whether all or any conditions must hold. Options let you search subcollections, include items in the Trash, include parent and child items of matches, and show only top-level items.
Give the search a name and click Save to keep it. Saved searches appear in the Saved Searches group of the sidebar (the + in its header opens a new search). It is a group of its own, not part of Library, so it shows whether or not Library is open. The group reads “No saved searches” until you save one. You can hide or move it under Settings > Appearance > Sidebars. Right-click one for Edit Search…, Rename or Delete…. Deleting a saved search never deletes items.
The item pane
Selecting an item shows its details on the right. At the top is the header with the item type, title, creators, publication and date, and the buttons Open PDF (or Open EPUB or Open snapshot), Cite (copies a citation), Find full text (when there is no PDF yet) and a ⋯ menu with Locate, Copy bibliography, Copy DOI and Find full text again.
Below the header a tab row jumps between sections of one scrolling pane. This is the default order. Under Settings > Appearance > Sidebars you can hide sections or reorder them, and the tabs follow:
| Tab | Section |
|---|---|
| Details | Editable fields of the item (click a field to edit it). Changing the item type changes the available fields. |
| Abstract | The abstract. |
| Notes | Child notes of the item; see Notes and web tabs. |
| Files | Attachments (PDFs, snapshots, links), with a preview of the PDF’s pages at the top. |
| Collections | The collections the item belongs to. |
| Tags | The item’s tags. |
| Related | Items related to this one. |
Selecting several items shows a summary instead. Edits are saved as you make them and picked up by the next sync.
PDF preview
When an item’s main attachment is a PDF, the Files section starts with its pages as thumbnails in a box you can scroll with the mouse wheel or trackpad. The preview does not open the full reader, so it appears quickly, and only the pages you scroll to are drawn. Double-click a page to open the PDF in a reader tab at that page.
- EPUBs, snapshots and links get no preview.
- A PDF over 30 MB is not read until you click Show preview. A large file, or one that is only in the cloud (for example OneDrive “online-only”), can take several seconds to load.
- Moving quickly through the list with the arrow keys does not load each PDF. The preview waits until you stop on an item. Pages you saw recently show again at once.
- The preview’s scrollbar cannot be dragged yet. Use the wheel or trackpad.
Next: Adding items, The reader.